The Secret to a Perfect Smoky Eye: Beginner’s Tutorial
Master the perfect smoky eye with this step-by-step tutorial designed for beginners, covering essential tools, blending techniques, and color choices for a captivating, confident look.
Ready to unlock the secrets of a mesmerizing smoky eye? The secret to a perfect smoky eye: a step-by-step tutorial for beginners lies in understanding the techniques and tools that transform your look from simple to stunning. This guide breaks down the process, making it accessible for anyone to achieve that coveted smoky effect.
Understanding the Allure of the Smoky Eye
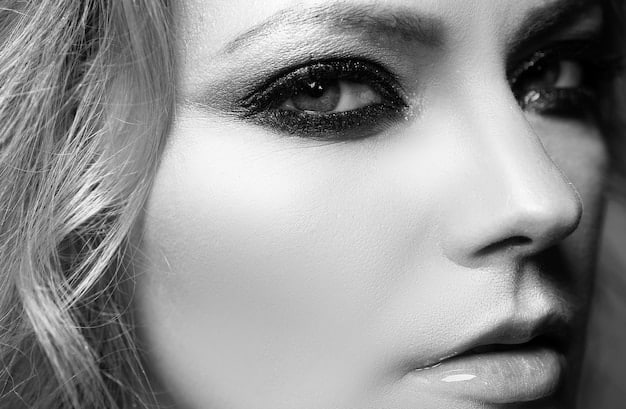
The smoky eye is a classic makeup look, known for its ability to add drama and allure to any face. But what makes it so appealing, and why has it remained a staple in beauty trends for so long?
Its versatility is undeniable. Whether you’re aiming for a subtle, everyday smolder or a bold, evening-ready statement, the smoky eye can be adapted to suit any occasion. But achieving the perfect smoky eye involves more than just slapping on some dark eyeshadow.
The Psychology of the Smoky Eye
The smoky eye isn’t just about cosmetics; it’s about confidence. The right application can enhance your natural features, making your eyes appear larger and more captivating. It’s a look that exudes self-assurance and mystery, drawing attention and creating a memorable impression.
Common Misconceptions about Smoky Eyes
Many beginners shy away from attempting a smoky eye, believing it to be too complicated or time-consuming. However, with the right guidance and a few simple techniques, anyone can master this look. The key is to start with the basics and gradually build up your skill.
- Myth: It requires lots of expensive products.
- Fact: You can achieve a great smoky eye with just a few essential tools and shades.
- Myth: It’s only for special occasions.
- Fact: A lighter, more subtle smoky eye can be perfect for daytime wear.
Ultimately, the allure of the smoky eye lies in its transformative power. It’s a makeup technique that can make you feel confident, beautiful, and ready to take on the world. By understanding the basics and practicing regularly, you can unlock its full potential.
Gathering Your Essential Tools and Products
Before diving into the application process, gathering the right tools and products is essential. Having everything you need at your fingertips will make the process smoother and more enjoyable.
Here’s a checklist of the must-have items for creating a flawless smoky eye:
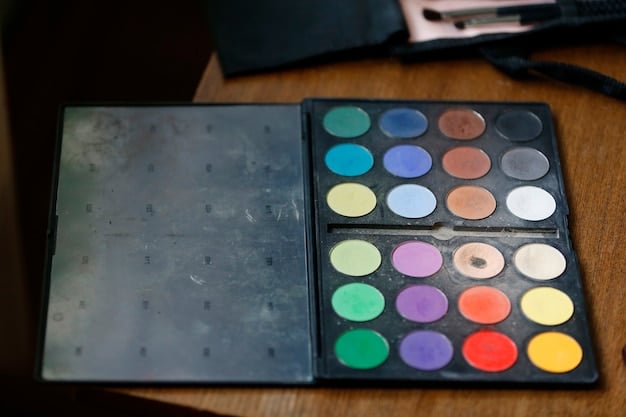
Eyeshadow Palette
Choose a palette with a range of neutral shades, including light, medium, and dark browns, grays, or blacks. Matte shades are ideal for creating depth and definition, while shimmers can add a touch of glamour.
Brushes
Investing in a few high-quality brushes is crucial for achieving a well-blended smoky eye. Here are the brushes you’ll need:
- Blending Brush: A fluffy brush with soft bristles for seamless color transitions.
- Shader Brush: A flat, dense brush for applying color to the lid.
- Pencil Brush: A small, pointed brush for precise application in the crease and along the lash line.
- Angled Brush: For applying eyeshadow as eyeliner.
Other Essential Products
Don’t forget these additional items for a complete smoky eye look:
- Eyeshadow Primer: To create a smooth base and prevent creasing.
- Eyeliner: A black or dark brown pencil or gel liner for adding definition.
- Mascara: To add volume and length to your lashes.
- Makeup Remover: For cleaning up any mistakes.
With these essential tools and products in hand, you’re well on your way to creating a stunning smoky eye. The key is to choose high-quality items that suit your skin type and preferred style.
Step-by-Step: Creating the Perfect Smoky Eye
Now that you have your tools and products ready, let’s move on to the step-by-step process of creating a smoky eye. This tutorial is designed for beginners, so we’ll start with a simple, classic approach.
Follow these instructions carefully, and don’t be afraid to practice until you feel confident with each step:
Step 1: Prime Your Lids
Apply a thin layer of eyeshadow primer to your eyelids. This will create a smooth base, prevent creasing, and help your eyeshadow last longer.
Step 2: Apply a Base Color
Using a shader brush, apply a neutral shade (such as a light brown or taupe) all over your lid, from lash line to crease. This will serve as your base color and help the other shades blend more easily.
Step 3: Add Depth to the Crease
With a blending brush, apply a medium shade (a slightly darker brown or gray) to your crease, blending it back and forth to create a soft transition. This will add depth and dimension to your eyes.
Step 4: Apply the Darkest Shade
Using a pencil brush, apply the darkest shade (black or dark brown) to the outer corner of your eye, blending it slightly into the crease. Be careful not to apply too much color at once; it’s easier to build up the intensity gradually.
Step 5: Blend, Blend, Blend!
This is the most crucial step in creating a smoky eye. Use your blending brush to blend all the shades together seamlessly, ensuring there are no harsh lines. This may take a few minutes, but it’s worth it for a flawless finish.
Step 6: Line Your Eyes
Apply eyeliner to your upper and lower lash lines. You can use a pencil, gel, or liquid liner, depending on your preference. Smudge the liner slightly with a pencil brush for a softer, more smoky effect.
Step 7: Apply Mascara
Finish the look with a generous coat of mascara on your upper and lower lashes. This will add volume, length, and definition to your eyes.
By following these steps carefully, you can create a beautiful and captivating smoky eye that enhances your natural features and adds a touch of drama to your look. Practice makes perfect, so don’t be discouraged if it takes a few tries to get it right.
Mastering the Art of Blending
Blending is the cornerstone of a flawless smoky eye. Without proper blending, the look can appear patchy and uneven. Mastering this technique will elevate your smoky eye from amateur to professional.
Here are some tips and tricks to help you perfect your blending skills:
Choose the Right Brush
As mentioned earlier, a fluffy blending brush is essential for seamless color transitions. Look for one with soft, flexible bristles that allow you to blend without creating harsh lines.
Use Small Circular Motions
When blending, use small, circular motions to gradually blend the colors together. Avoid applying too much pressure, as this can create muddy or uneven patches.
Work in Layers
Instead of applying a lot of color at once, work in thin layers, gradually building up the intensity. This will give you more control over the final look and make it easier to blend.
Clean Your Brush Regularly
To prevent color buildup and ensure smooth blending, clean your brush regularly with a brush cleaner or gentle soap and water. A clean brush will give you better results and help your makeup last longer.
Practice Patience
Blending takes time and patience. Don’t rush the process; instead, take your time and focus on creating a seamless transition between the shades. The more you practice, the better you’ll become at blending.
Blending is a skill that takes practice to master, but with these tips and tricks, you’ll be well on your way to creating a flawless and captivating smoky eye. Remember to be patient, work in layers, and choose the right tools for the job.
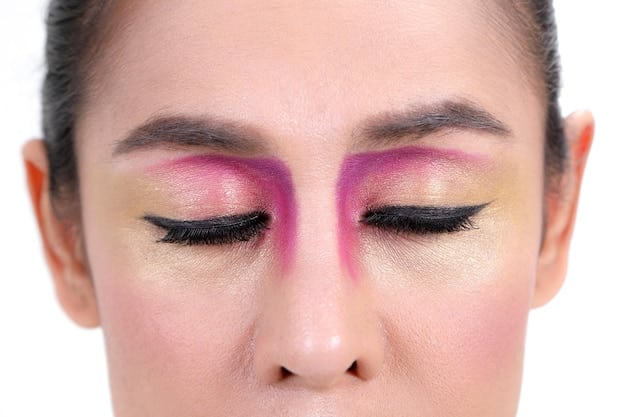
Exploring Different Color Combinations
While the classic smoky eye typically involves shades of black, gray, and brown, there’s no limit to the color combinations you can explore. Experimenting with different hues can help you create unique and personalized looks that suit your individual style and skin tone.
Here are some popular color combinations to try:
Warm Browns and Golds
For a softer, more natural smoky eye, try using shades of warm brown and gold. These colors complement most skin tones and are perfect for daytime wear.
Purples and Plums
Purple and plum shades can add a touch of drama and sophistication to your smoky eye. These colors are especially flattering on those with green or hazel eyes.
Greens and Khakis
Green and khaki shades can create a unique and earthy smoky eye. These colors are ideal for those with brown or amber eyes.
Blues and Silvers
For a bold and edgy look, try using shades of blue and silver. These colors can make your eyes appear brighter and more striking.
- Consider your skin tone: Certain colors may complement your skin tone better than others. Experiment to find what works best for you.
- Think about the occasion: A subtle, neutral smoky eye may be better suited for daytime wear, while a bold, colorful look may be perfect for a special event.
- Don’t be afraid to mix and match: Try combining different colors and textures to create your own unique smoky eye.
The secret to finding the perfect color combination is to experiment and have fun. Don’t be afraid to step outside your comfort zone and try new things. With a little practice, you’ll discover the colors that make your eyes pop and enhance your natural beauty.
Tips for Long-Lasting Smoky Eyes
Creating a stunning smoky eye is one thing, but ensuring it lasts throughout the day or night is another. Here are some essential tips to help you keep your smoky eye looking fresh and flawless for hours:
Follow these guidelines to avoid smudging, creasing, and fading:
Use an Eyeshadow Primer
As mentioned earlier, eyeshadow primer is crucial for creating a smooth base and preventing creasing. Apply a thin layer to your eyelids before applying any eyeshadow to ensure your look lasts longer.
Set Your Makeup
After applying your eyeshadow, set it with a translucent powder. This will help absorb excess oil. Select a good setting spray for longer events.
Choose Waterproof Products
If you’re attending a special event or anticipate sweating, choose waterproof or smudge-proof eyeliner and mascara. These products are designed to withstand moisture and will help prevent your smoky eye from smudging or running.
Avoid Touching Your Eyes
Throughout the day, avoid touching or rubbing your eyes. This can transfer oils and dirt to your makeup, causing it to smudge or fade.
- Carry blotting papers: Blotting papers can help absorb excess oil without disturbing your makeup.
- Reapply mascara as needed: If your mascara starts to flake or fade, reapply a thin coat to refresh your look.
- Touch up your eyeliner: If your eyeliner starts to smudge, use a cotton swab to clean it up and reapply as needed.
With careful application and the right products, you can enjoy a captivating smoky eye that lasts from morning to night. Remember to prep your lids properly, set your makeup, and avoid touching your eyes throughout the day. These simple steps will help you maintain a flawless and long-lasting look.
| Key Point | Brief Description |
|---|---|
| 🎨 Blending Techniques | Master seamless transitions with the right brush and circular motions. |
| ✨ Essential Tools | Prioritize a quality eyeshadow palette, blending brush, and eyeliner. |
| 🌈 Color Exploration | Experiment with warm browns, purples, and blues for personalized looks. |
| 🛡️ Long-Lasting Wear | Use primer, setting powder, and waterproof products for all-day hold. |
Frequently Asked Questions
▼
A palette with a range of neutral shades, including light, medium, and dark browns, grays, or blacks, works best. Matte shades are ideal for creating depth, while shimmers bring glamour.
▼
A blending brush is essential for seamless transitions. Use a shader brush for applying color to the lid, and a pencil brush for precise application in the crease and along the lash line.
▼
Use an eyeshadow primer, set your makeup with powder, and opt for waterproof products. Avoid touching your eyes and consider carrying blotting papers for excess oil. Select a setting spray for longer lasting results.
▼
No, a lighter, more subtle smoky eye can be perfect for daytime wear. Adjust the intensity of the shades to suit the occasion. Use lighter browns and golds for a day smoky eye.
▼
Avoid applying too much product at once. Work in thin layers. Thoroughly blend each layer using small, circular motions with a clean brush to ensure a seamless transition and prevent a muddy look.
Conclusion
Mastering the secret to a perfect smoky eye: a step-by-step tutorial for beginners is an achievable goal with the right techniques and tools. By following this guide, you can create a flawless, captivating look that enhances your natural beauty and boosts your confidence. Embrace the process, experiment with colors, and enjoy the transformative power of the smoky eye.


